Release 04/13/2025 PM
Web – (please clear your cache on your browser)
Mobile – (Make sure you have the latest version: iOS/Android 2.3.4)
New Features
Web 1.2
Enhancements to ERP/BT Sync
Pick Up tickets will now remove on-rent status. BT Archive changes to on hand will also remove the On-Rent flag. Either will close/resolve on rent entries on the Admin Console.
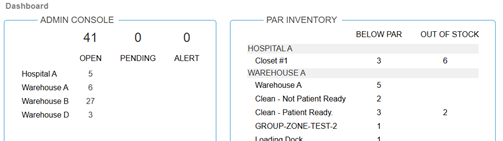
Dashboard Added
Supplier Admin can now access a dashboard to show PAR amounts below PAR or out of stock and open console records/alerts.
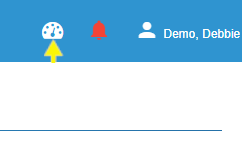
After logging in, the supplier admin can click on the gauge near the right top corner near the Supplier Admin’s name.
The Dashboard will open and show locations that have open Admin Console Records and/or Alerts. It will also show locations that are at or below PAR or at 0 (Out of Stock). From this page, use the back arrow on your browser to return to the previous page or click an icon in the left side menu.
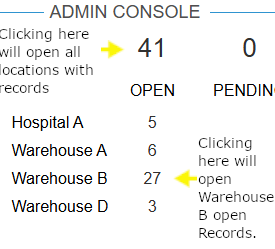
Clicking on a number in the admin console will open the admin console filtered for that location and that tab. Clicking on a number under open will show the open tab in the Admin Console, Pending will show the Pending tag, and Alert will show the Alert tabs. Clicking on the total number at the top will open all locations that have open records.
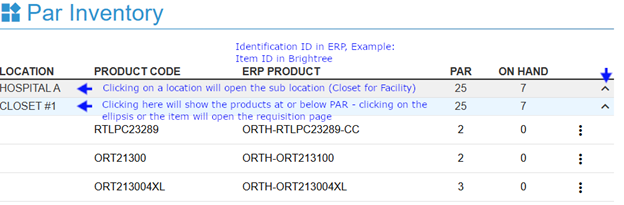
Clicking anywhere on the PAR inventory box will open a table allowing the user to drill down for more information and ultimately go to the requisition page to create a requisition or check auto created requisitions for a location.
Clicking anywhere on this box will open the PAR Inventory Table. If there is nothing here, then no PARs have been created or no item/group is below PAR
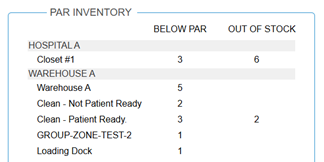
The PAR Inventory Table will show all locations with items/groups below PAR. Drill down to a sublocation by clicking on a location Warehouse/Facility. Example a Warehouse will show zones and vehicles that have products below PAR. Clicking on the sublocation will show the products below PAR. Click on the products will open the requisition page for the user to check autocreated requisitions or add a requisition for the product. Use the back arrow on your browser to return to the previous page or click an icon in the left side menu.
Improved Admin Console Filtering/Enhancements
Going through the Admin Dashboard will automatically filter locations and records. However, there is additional enhancements to the console itself. The console will only show locations that have records on the console.
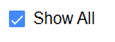
Show All with a check shows all locations for the User (all locations with records are checked and all statuses).
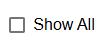
Unchecking the Show All box will remove all selections in the dropdowns for locations, sublocations and statuses.
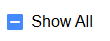
Unchecking some of the options in the dropdowns for locations, sublocations and statuses will show the Show All box with a dash to indicate only some of the options have been selected.
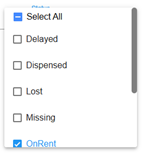
Checking, Unchecking, or checking some of the option in a dropdowns for Location, Sub-Location, and Status will result in Select All displaying the same behavior as show all. Removing the check from Select All will allow remove all checks and allow user to select a location, sub-location, and/or status. (For example, uncheck Select all for status would allow a user to select just On Rent for the locations/sublocations selected. If nothing appears on the Admin Console, then no records exist.
Other improvements to Admin Console:
- Serialized Only Box: Shows only Serial Numbers with open records meeting any filtering selection.

- Refresh: will remove filtering for sub-locations and statuses.

- Closed Records: Opens the closed records tab. These history records were removed from the top level Admin Console to improve speed of record display. The same filtering can be applied to the Closed Record (History) as the top level of the Admin Console. Use your back browser button to return to the top level (current records) of the Admin Console.

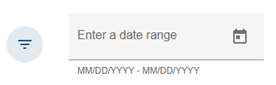
- Filtering: Opens the filtering by Date. You can enter dates or click on the Calendar to select dates. The first date begins the range and the second click on the calendar gives the end point of the range.
Policy – Web
Policy support was added to HME360 web and mobile. Web consists of selecting serialized items that will be available for the policies defined on the web, defining policies, and selecting zones that will show a mobile user products that need that policy that are on hand in that zone. POLICY MUST BE CONFIGURED ON THE WEB BEFORE MOBILE CAN BE USED TO DOCUMENT THE POLICY. The User can also see/download a record of the policy from the web.
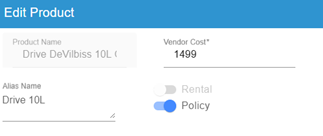
In Configurations > Vendor > Products, the Supplier Admin can turn on the policy for that product by toggling on the policy in the product edit screen.
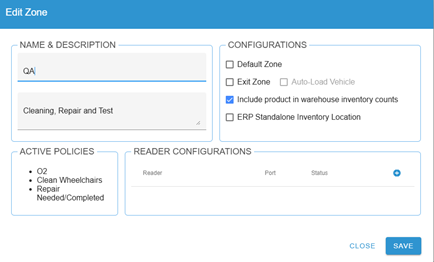
In Configurations>Inventory>Policy Configurations, the Supplier Admin can select a zone that will trigger the policies selected/created here. The user can give the policies name to help the mobile user choose the right policy for the equipment with the policy. The Supplier Admin can choose one or more than one to add to a zone. The user can also Add/Edit Policies – there are three preset policies:
- Clean – User can edit sample text to indicate what the Mobile user is attesting to and work performed. Both conditions must be satisfied for the policy to be completed on Mobile.
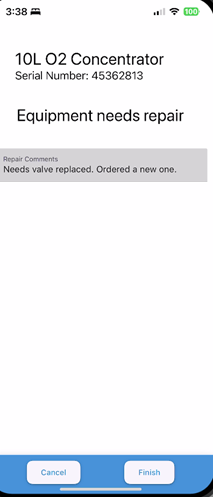
- Repair – User cannot edit this policy. It consists of a Note field for the user to say what needs to be repaired (needs new wheel), and a check box to confirm when the repair has been completed.
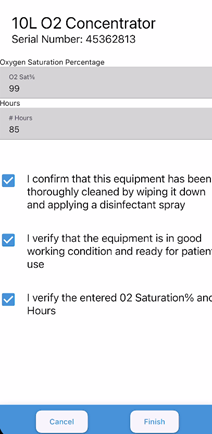
- Oxygen/Clean and Test – User cannot edit this policy. It consists of note fields for 02 Sat and Hours, and check boxes to verify/cleaning and testing had occurred.
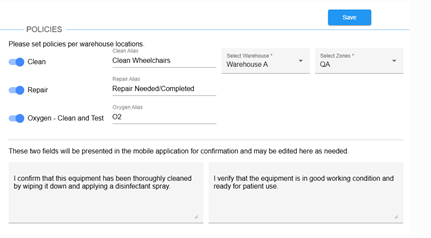
In Configurations>Ordering>Locations>Warehouse>Zones>Edit, the Supplier Admin can verify/see the policy/policies set up for the zone.
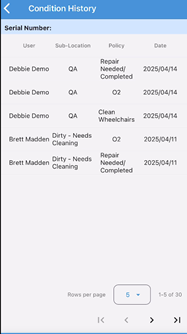
In Configurations>Inventory> RFID/SN History Search a tab was added for Policy. The user will enter the SN/RFID and click Search. After a successful search, the user will be presented with the History and then may click on the policy tab, which will show completed policies. Clicking Download will allow the user to save all policies completed. Hovering over the note icon will show user a preview of notes that were entered by mobile user during the completion of the policy.

Example of Policy Download:

Quality of Life Improvements
Inventory Views: Added lines and froze headers allowing user to scroll down, but still see the headers. (Added to all inventory views for Facility/Closet, Warehouse/Zone & Vehicle, and Products Tab).
Auto dispense barcode only/nonserialized: If sync is enabled, rather than move nonserialized/barcode items to the admin console if this feature is enabled missing will be auto dispense and not show up on the Admin Console.
Mobile v. 2.3.4
Improvement to Inventory Refresh: Improvements have been made to the loading and refreshing of inventory status in the mobile. When entering Update/View flows an inventory refresh will close. A notification will appear at the bottom of the screen alerting the user of the refresh is happening. If the user clicks on a flow before the inventory finishes loading the user will see a pop up explaining it is still loading, the user can click close and wait or leave the modal open and the chose option will open when the inventory refresh is completed.
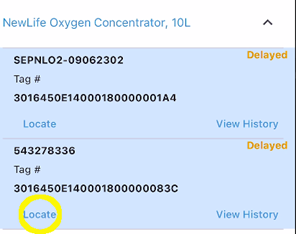
Intransit/Delayed Toggle
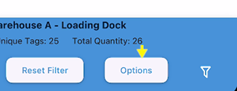
In View Inventory an additional toggle has been added to allow a user to see items in the zone that have exited but have not been scanned onto a vehicle or another location.
- Open View from the Home Screen
- Select Inventory View
- At the bottom of the screen, Tap the Options button:
- Select option for delayed in pop-up and click close. The options button will be outlined in red to show an option has been applied.
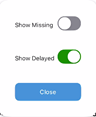
- In Transit tags will appear at the bottom of the inventory view.
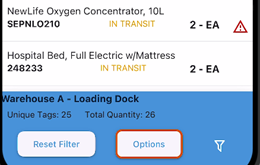
- Long Press on an In Transit item to see the tag history or use the locate to see if the tag is still there.
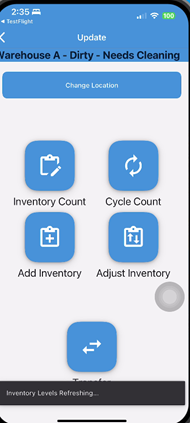
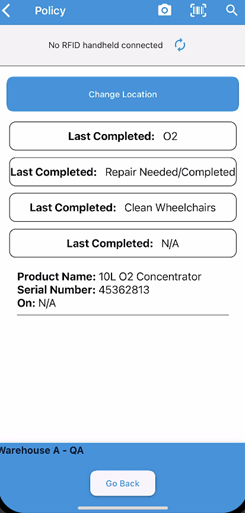
Policy
Policy has been added to the mobile. This feature will allow a mobile user to scan or select an item that is in a zone with policies enabled and select a policy to apply. The user then selects the policy needed, checks the check boxes needed and/or enters notes to complete the policy and submits. POLICY MUSTE BE SET UP ON THE WEB BEFORE IT CAN BE USED IN THE MOBILE.
- After a serialized item has been scanned onhand in a policy zone (a zone with policies assigned to it, the user from the home screen taps Update>Policy.
- All products in the zone will appear and indicate whether they have no completed policy or date of completed policy. The user can either scan in the serial number or tap the item on the screen
- A pop up will open asking the user to select the policy that they’re completing. Policy will appear with the name set by the supplier admin on the web.
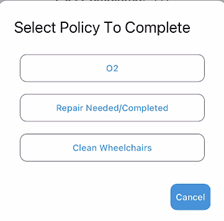
- Each policy is based on a basic canned policy. The supplier Admin can change the cleaning policy to reflect their flow. For cleaning, the user may add notes in the note field, but they must tap the boxes in front of each statement to attest they have completed what is indicated before the policy update will save.

- For Oxygen, O2 Sat percentage and number of hours must be entered in the screen by tapping on each field and entering the information requested and tapping all three statements. Only after this is done can the Oxygen policy be saved.
- The repair policy consists of a note field where the mobile user can tap in what was done, the status of the repair, etc. For example, the mobile user could have fixed the wheel on a wheelchair, but the brakes need a part to be ordered. They could enter the information and then when the parts are received and the completed. The user could enter the new information in a repair policy for that date and finish. History would show more than one repair policy as the repair progresses.
Policy History
On Mobile, the user can from the Home Screen, tape view and then History to view Policy History and then scan a serial number. They can also go through Inventory or Locate under View to see the history. In Inventory View and Locate, the user finds the products, long presses on the product name and then selects History. A pop-up will ask the user to select Policy or Inventory History. If the user selects policy the serialized product’s Policy history will open.
Sort Status Selection
Tapping the cog at the top of the Home Screen will allow the user to select a preference for how scan products will be displayed.
Tap Cog at top of home screen
In Scan Setting for Item Ordering, the user can select their preference.
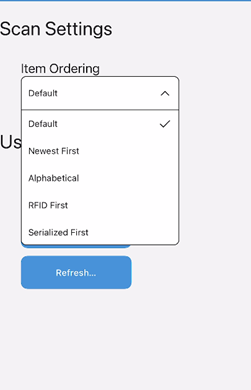
Default: Puts last scanned at the bottom of the scanned items screen list.
Newest First: Put the last scanned item at the top of the items screen list.
Alphabetical: Arranges scanned item list in Alphabetical order.
RFID First: All RFID tags are arranged at the top of the scanned item list, barcode would be at the bottom.
Serialized First: Serialized items (whether barcode or RFID) would be shown at the top of the scanned item list.
Log out Interval: Security requires the user to be active on the screen or user will be logged out after 10 minutes of no screen interaction. An interaction is defined as a finger touch to the screen.