Release 03/02/2025 PM
Web – (please clear your cache on your browser)
Mobile – (Make sure you have the latest version: iOS/Android 2.2.5)
New Features
Web
PAR – Like Products
Update to Like Products to improve PAR and roll up individual amounts into the total for Warehouse. Add PAR Levels to the downloads on Inventory View for Warehouses on the Web.
- Left side Menu select Inventory >Warehouse
- Select Zone or Vehicle
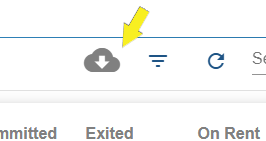
- Top of the page click on download
- Save the download.
- In the file there will be a column for PAR for the Like Product (Groups) and the individual Items if set.
Preferred Product – Like Products
Added ability to select preferred product for ordering for Like Products. Selecting a product will create a requisition with the preferred product for amounts below PAR for the group instead of the actual products. If the actual product is desired, it can be added to the requisition in edit for the requisition. (see next entry)
- Like Products find group to set product for.
- From the ellipsis at the end of the line, select Edit Group Locations.
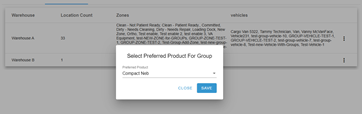
- From the Warehouse line, click the ellipsis and select the Preferred Product for Group.
- In drop down select Product and save.
Auto Requisition for Warehouse
Requisitions will be created for the Warehouse to refill PAR amounts. The open requisition will adjust depending on changes in inventory until it is submitted in the Requisition Screen.
- From the Left Side Menu>Select Purchasing
- Select Open Requisition for the vendor and location.
- Select Submit in the ellipsis at the end of the line to Close the Requisition and Print/Save the Purchase Orders.
- Select Edit to add products or change quantities on the Requisition.
Multiple HCPCs for Products
Multiple HCPCs can be assigned for use in the Referral Management flow. Secondary HCPCs can be assigned to a product to define it as customized versus off the shelf.
To enable secondary HCPC:
- From the Left Menu, click the Cog (Configurations). Click on Locations under Ordering and select Vendor on the Facility.
- Click on Products
- Click on the ellipsis (3 verticle dots) on the product line.
- Select Add Secondary HCPCs.
- Enter additional HCPCs and Confirm.
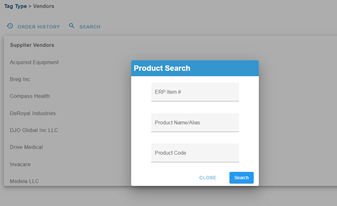
Global Product Search
A search field has been added to Tag Printing. The user can now click on Search on the Vendor page at the top and search the Product Code, Product Name/Alias, or the ERP Item # (Brightree Item ID) to pull up products that match the search criteria.
A search results page will open with products that match and allow the user to print tags for multiple vendors on the page. If the user is printing tags for only one vendor, after entering the number of tags needed, the user will be presented with a modal to enter the Serial Numbers if needed, followed by a send to printer modal to print, and a tag file will be created in tag history. If multiple products from different vendors are selected, a send-to-printer modal will appear for each vendor, and a tag file for each vendor will be added to the tag history.
PAR in Inventory View – Update
In Inventory View on the web, instead of removing any product that has zero on hand, if the product has PAR, the product will show up with a 0 to allow the user to track items that are out of stock but have PAR needed.
- Left Menu>Inventory View>Select Location
- Select Zone, Vehicle, or Closet
- Amounts that have zero on hand, but have PARs set will appear.
Tag for Fleet for Smart Readers.
For Suppliers that have the ability to set up a drive-through area with antennas, the user has the ability to now print a tag for the vehicle. When the Antenna catches the tag with product tags within 5 minutes, it will put the product as in transit/on hand on the vehicle for the tag.
Before printing tags for Vehicles, the user will need to set up the tag layout in configuration under Vehicle.
- From Left Hand Menu, Select Configuration
- Under system, select Tag Layout
- Select Vehicle Tag
- Set tag size for each warehouse or just for the default.
- Confirm
To Print and Assign to Vehicle
- From Left Hand Menu, Select Tags
- Select Vehicle option.
- Select Warehouse Vehicle is attached to
- Select the Vehicle.
- Tap Create Tag
- Go Back
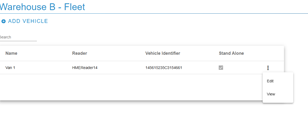
- From Left Hand side, Select Locations under Ordering.
- Select Warehouse where the vehicle is a part of the Fleet
- Select ellipsis for the vehicle – and pick edit
- In the modal that opens, Click Print Vehicle Tag
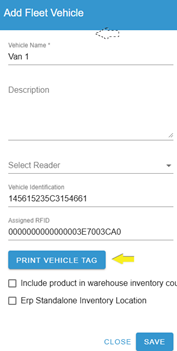
- Select Warehouse or default that is printing the tag.
Mobile
! Issue noted in inventory history. After clicking on history on the detail screen after the long press, a modal offers the option of policy and inventory history. Selecting policy will give the user the message “Try Again” and then return the user to login. The policy is not enabled yet; the app will be updated shortly to remove the option!
Updated Mobile Home and Inventory Flow: Reduced the number of icons on the home screen.

- Settings Cog—This has been moved to the top for PIN set-up/change, location set, and cache/inventory refresh.
- Change Location—This feature was added to the home page to allow the user to change their location from the home screen.
- Update—The inventory Add, Inventory Count, Cycle Count, Adjust Inventory, and Mobile Transfer functions have been moved here.
- View – Inventory View, Tag History, and Locate have been located here.
Updated Filters
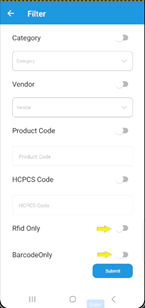
At the bottom of inventory screens (Add, Count, Cycle Count, Adjust, and Mobile Transfer), when the user taps on the filter icon:

The filter page opens. We have Added new options for toggle tag types: RFID Only and Barcode Only. Prior to scanning, if the user toggles on the filter for RFID or Barcode, this will allow the user to affect only the toggled-on tag type.
Mobile Transfer
In Updates, the user can click on the icon:

This will allow users at one location to transfer amounts from the selection location to the “To” location.
For nonserialized/nonRFID – this will decrease the amounts in the location and add them to the “To” destination and initiate a change in the amounts in the ERP system.
For serialized/nonRFID – this will move the serialized item from the selected location to the “to” location. This will initiate a transfer in the ERP system.
For nonserialized/RFID, this will move the amounts scanned from the selected location to the “to” location.
For serialized/RFID items, this will move the serialized item from the selected location to the “to” location and initiate a transfer in the ERP system.
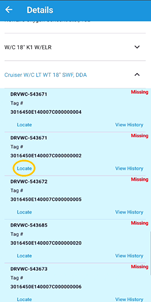
Show Missing: A new toggle in View Inventory on mobile shows users items that are missing for the location on the Admin Console. This allows the user to use the locate function to potentially locate equipment in the area.
- Open View Inventory
- Toggle Show Missing on.
- Missing items on the Admin Console will appear at the bottom of the listing.
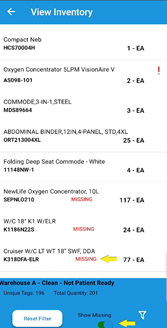
- Long Pressing on the missing Items will open the detail and allow the user to tap locate.