Enabling a Vendor and Products for a Location
For a new product that will be tracked or provided through HME360, the Supplier Admin will need the vendor, product code (SKU), or Manufacturer ID. If the vendor has not already been added to the supplier, the Supplier Admin can add them and then enable the product. This scribe will guide the user through adding a new vendor, locating the required product using the new or existing vendor, and enabling the product for the supplier.
1. Click “Configuration”

2. Click “Vendors”

3. Click “Vendors”

Using Exisiting Vendor
4. Find the needed Vendor by scrolling through the list. They are in alphabetical order if they have any products enabled if, they have 0 products, they will be at the bottom. Click on the Vendor’s name OR

Using a New Vendor
5. Click “Add Vendor”

6. Click this dropdown.

7. Click on the required Vendor. Tip: If it is not there, contact HME360Support.

8. All fields are required. If the required information is unknown, please use a placeholder like “unknown.” For fields that follow a specific format, such as email (name@something.com) or phone numbers (123-456-7890), please follow the indicated format.
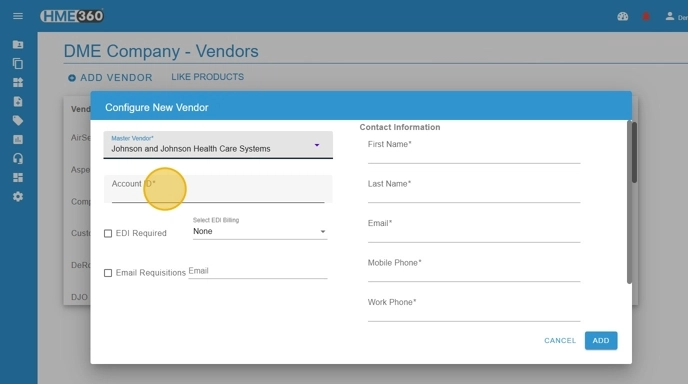
9. Click this checkbox, if you are using requisitions and will need to email them to this vendor.

10. Add the email. It must be in a name@name.com format.

11. Click “ADD”

12. Scroll to the bottom of the list and locate the newly added vendor. Click on the vendor’s name.

13. Find your product and click on the three dots at the end of the line (ellipsis) for the more menu.

14. Click “Enable”

15. Enter the Last Vendor Cost – Required

16. Add a more familiar name for your staff/patients if required. The default name will be the Product Name that appears in the field above.

17. Update the HCPCS Code as needed. It must consist of a letter and four numbers.

18. Toggle on Manufacturer Serialized to track Serial numbers in HME360. Toggle on the RFID Tag Required if the item will need an RFID tag.

19. Type in the Item ID from the ERP if ERP Sync will be used

20. Click “SAVE”

Add to the Location
21. Click “settings”

22. Click “Locations”

23. Click “Warehouses” or “Facilities”.

24. Choose the location needed and click “Vendors” on the card.

25. Click on the dropdown arrow in the field “Manage Vendors” if the vendor’s card is not visible.

26. Find the needed vendor and click the check box in front of the name.

27. The Vendor’s card will appear.

28. Click “Products” on the card

29. If the product does not have a check mark in the enabled column, click the three dots at the end of the line to open a “More” menu and select enable. Follow the steps to enable it for a closet, zone, vehicle or warehouse.
